> ## Documentation Index
> Fetch the complete documentation index at: https://documentation.dioptra.ai/llms.txt
> Use this file to discover all available pages before exploring further.
# Setting Up Custom Playbooks
> Setting up custom playbooks can be done quickly and easily in Dioptra from the Word Add-in and in the Web App.
To reduce errant redlining of your standard form language and increase accuracy, we use separate playbooks for reviewing mark-ups to your standard form and your review of counterparty forms. Make sure to follow the instructions for the playbook based on whose paper is the base document.
## **Playbooks to Review Your Counterparty's Form**
Dioptra offers a number of market standard playbooks for reviewing counterparty forms for common agreement types such as SaaS, DPAs, NDAs, etc. You can create your custom playbook by modifying one of these market standard playbooks or by creating a new playbook. Below we describe the different mechanisms through which you can quickly set up your custom playbook.
### Using the Chat to Build and Modify Playbooks
Building or adding to a playbook using the [Chat](/chat) is as easy as typing "Create guidelines". Literally.
You can build your AI enabled playbook simply asking the [Chat](/chat) agent to create guidelines from any combination of prior redlines, your standard form, or any existing playbook or guidelines that you may have.
* **Step 1: Select your Source Material**. Open one of the documents you want the agent to take into account, attach any additional documents to the [Chat](/chat) using the "+" at the bottom of the [Chat](/chat) and type "Create guidelines".
* **Step 2: Confirm your Playbook Details**. Answer the questions posed by the [Chat](/chat) agent and choose either a new playbook or an existing playbook to house the guidelines that the [Chat](/chat) will generate.
* **Step 3: Review the Rules**. Review, modify as needed, and accept the guidelines. The guidelines have 5 elements all of which will be generated by the AI, but are editable by you. The 5 elements are: name, description, rule, comment, and risk score.
Add to your existing playbook anytime by asking Chat to create a new guideline or guidelines. For example, you can say "Review my redlines in Section 7.1 Vendor Indemnities and create a new guideline in my Vendor contract review playbook reflecting these redlines."
### Build a Playbook in the Web App
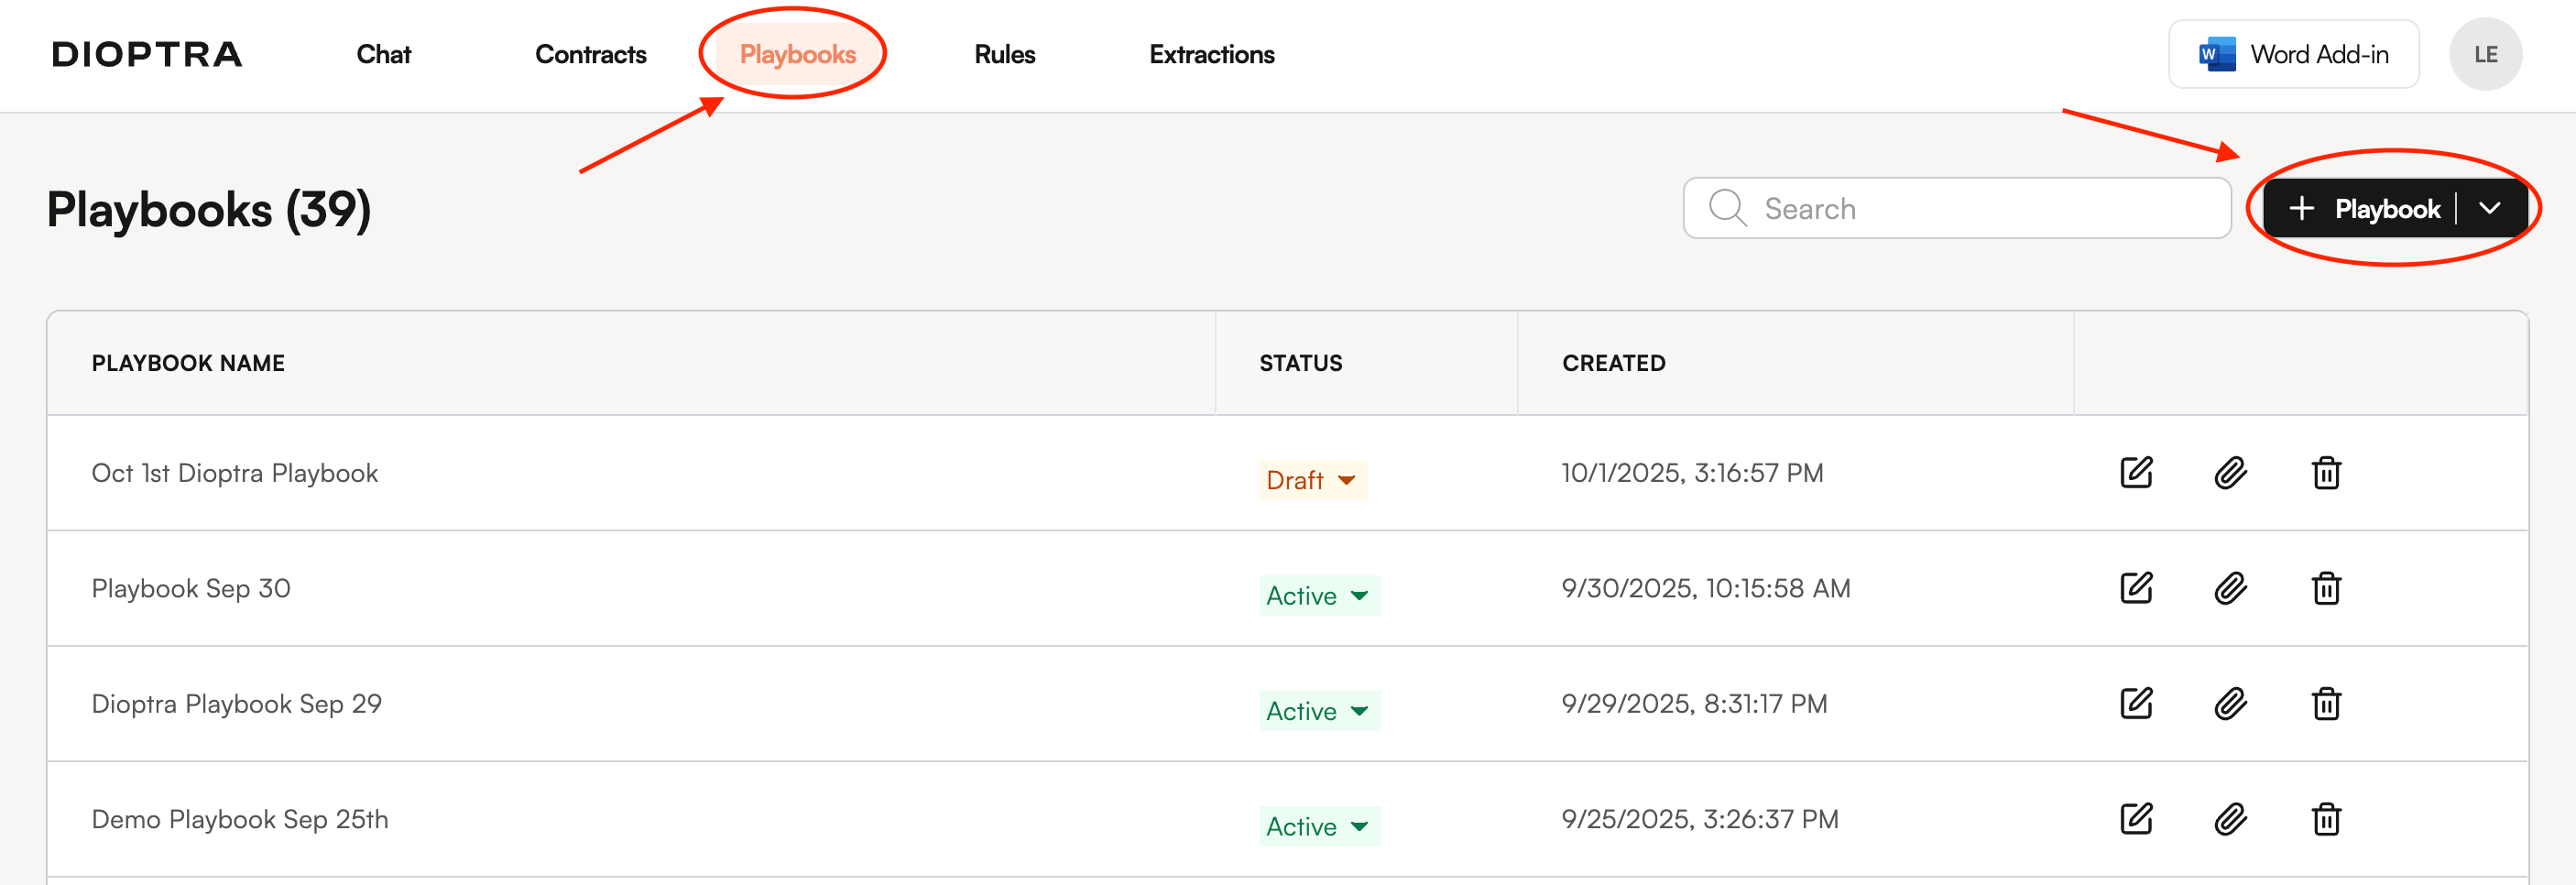
**Step 1: Navigate to the playbook tab in the app and select + Playbook**
 **Step 2: Give your playbook a name**
**Step 3: Choose whether you are duplicating an existing playbook or creating a net new playbook**
#### Duplicate an Existing Playbook
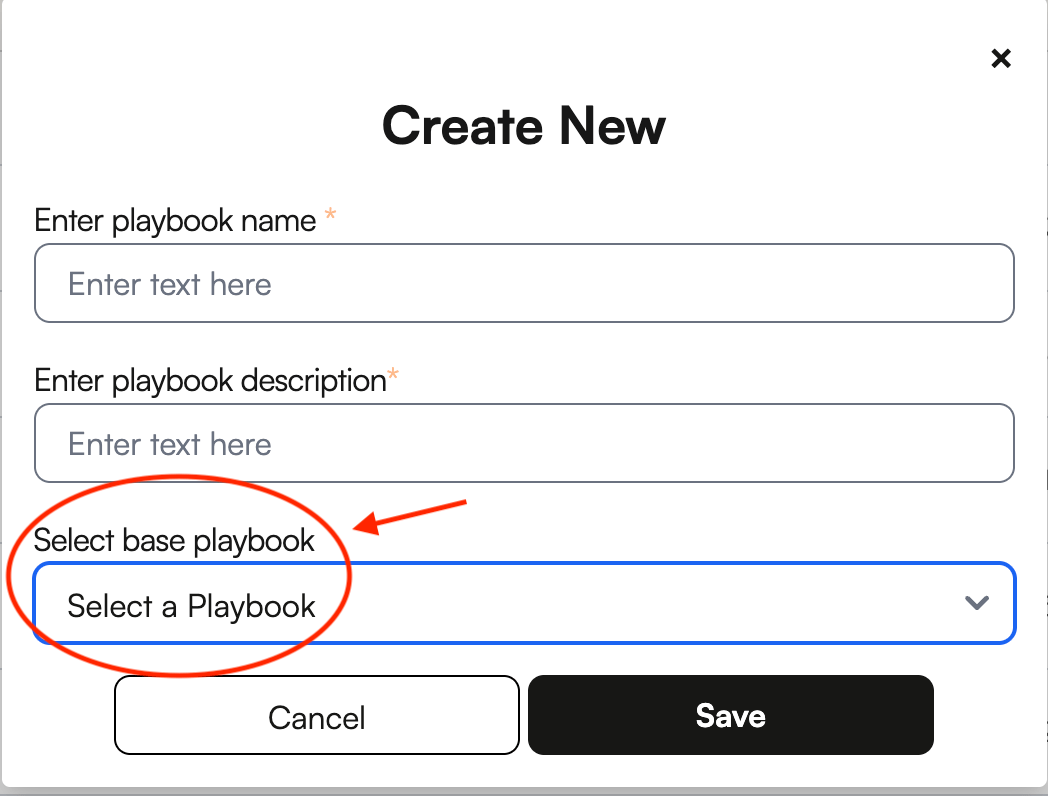
Give your new playbook a name and select the playbook you want to duplicate as the Base Playbook.
**Step 2: Give your playbook a name**
**Step 3: Choose whether you are duplicating an existing playbook or creating a net new playbook**
#### Duplicate an Existing Playbook
Give your new playbook a name and select the playbook you want to duplicate as the Base Playbook.
 #### Add Existing Rules from the Rule Bank
#### Change Managed Rules
## **Playbooks to Review Counterparty Changes to Your Standard Templates**
Follow these steps to create a playbook for reviewing counterparty redlines to your standard templates. These playbooks are designed to focus the agent's attention and application of remedies on track change redlines from the counterparty.
### **Step 1: Create your Playbook Table.**
To power your first party playbook, Dioptra has to ingest your playbook positions in a specific format. There are a few different ways you can create the required format.
What you need: The Dioptra Word Add-In, your existing playbook (guidelines, cheat sheet, etc), your template form, our managed prompt.
Steps:
1. Open the Dioptra Word Add-In, navigate to the saved prompts, and select "*Translate Current Guidelines for Template Form Review to Dioptra Format For Standard Form Playbook Creation*"
#### Add Existing Rules from the Rule Bank
#### Change Managed Rules
## **Playbooks to Review Counterparty Changes to Your Standard Templates**
Follow these steps to create a playbook for reviewing counterparty redlines to your standard templates. These playbooks are designed to focus the agent's attention and application of remedies on track change redlines from the counterparty.
### **Step 1: Create your Playbook Table.**
To power your first party playbook, Dioptra has to ingest your playbook positions in a specific format. There are a few different ways you can create the required format.
What you need: The Dioptra Word Add-In, your existing playbook (guidelines, cheat sheet, etc), your template form, our managed prompt.
Steps:
1. Open the Dioptra Word Add-In, navigate to the saved prompts, and select "*Translate Current Guidelines for Template Form Review to Dioptra Format For Standard Form Playbook Creation*"
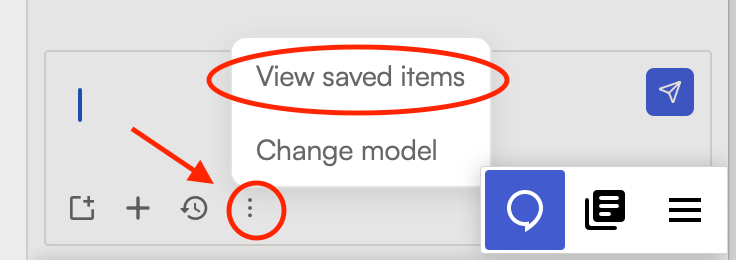 2. Attach your standard template and existing playbook to the chat using the "+" icon at the bottom of the chat (if one of these documents is where you have the Chat open in Word, you only need to attach the one that is not open). Note: if your existing playbook is in a format other than Word or PDF, you will need to first convert it to a .docx file, but you don't need to make it look pretty or fit on the page. Submit the request.
3. The final output will be a table in the correct format. Use the button under the Chat output with the table to copy and then paste into an Excel sheet.
What you need: The Dioptra Word Add-In, your example redlines, your template form, our managed prompt.
Steps:
1. Open the Dioptra Word Add-In, navigate to the saved prompts, and select "*Create 1st Party Paper Playbook from Redlines*"
2. Attach your standard template and example redlines to the Chat using the "+" icon at the bottom of the Chat (if one of these documents is where you have the Chat open in Word, you only need to attach the ones that are not open). Note: to properly inform the agent, the example redlines should show both the counterparty's redlines and your own and you should include example redlines for the negotiation stage that you want the agent to mimic. For example, if you want the agent to create redlines that reflect your first turn responses, only use example redlines that reflect your first turn responses.
3. The final output will be a table in the correct format. Use the button under the Chat output with the table to copy and then paste into an Excel sheet.
Note: If your objective is a playbook that accurately reflects your preferred positions, this is the least likely approach to achieve that objective as the agent will have insufficient insights into your preferences.
What you need: The Dioptra Word Add-In, your template form, our managed prompt.
Steps:
1. Open the Dioptra Word Add-In, navigate to the saved prompts, and select "*Create 1st Party Paper Playbook from Template*"
2. Attach your standard template to the Chat using the "+" icon at the bottom of the Chat (if you already have your standard template open where you have the Chat open in Word, it does not need to be attached).
3. The final output will be a table in the correct format. Use the button under the Chat output with the table to copy and then paste into an Excel sheet.
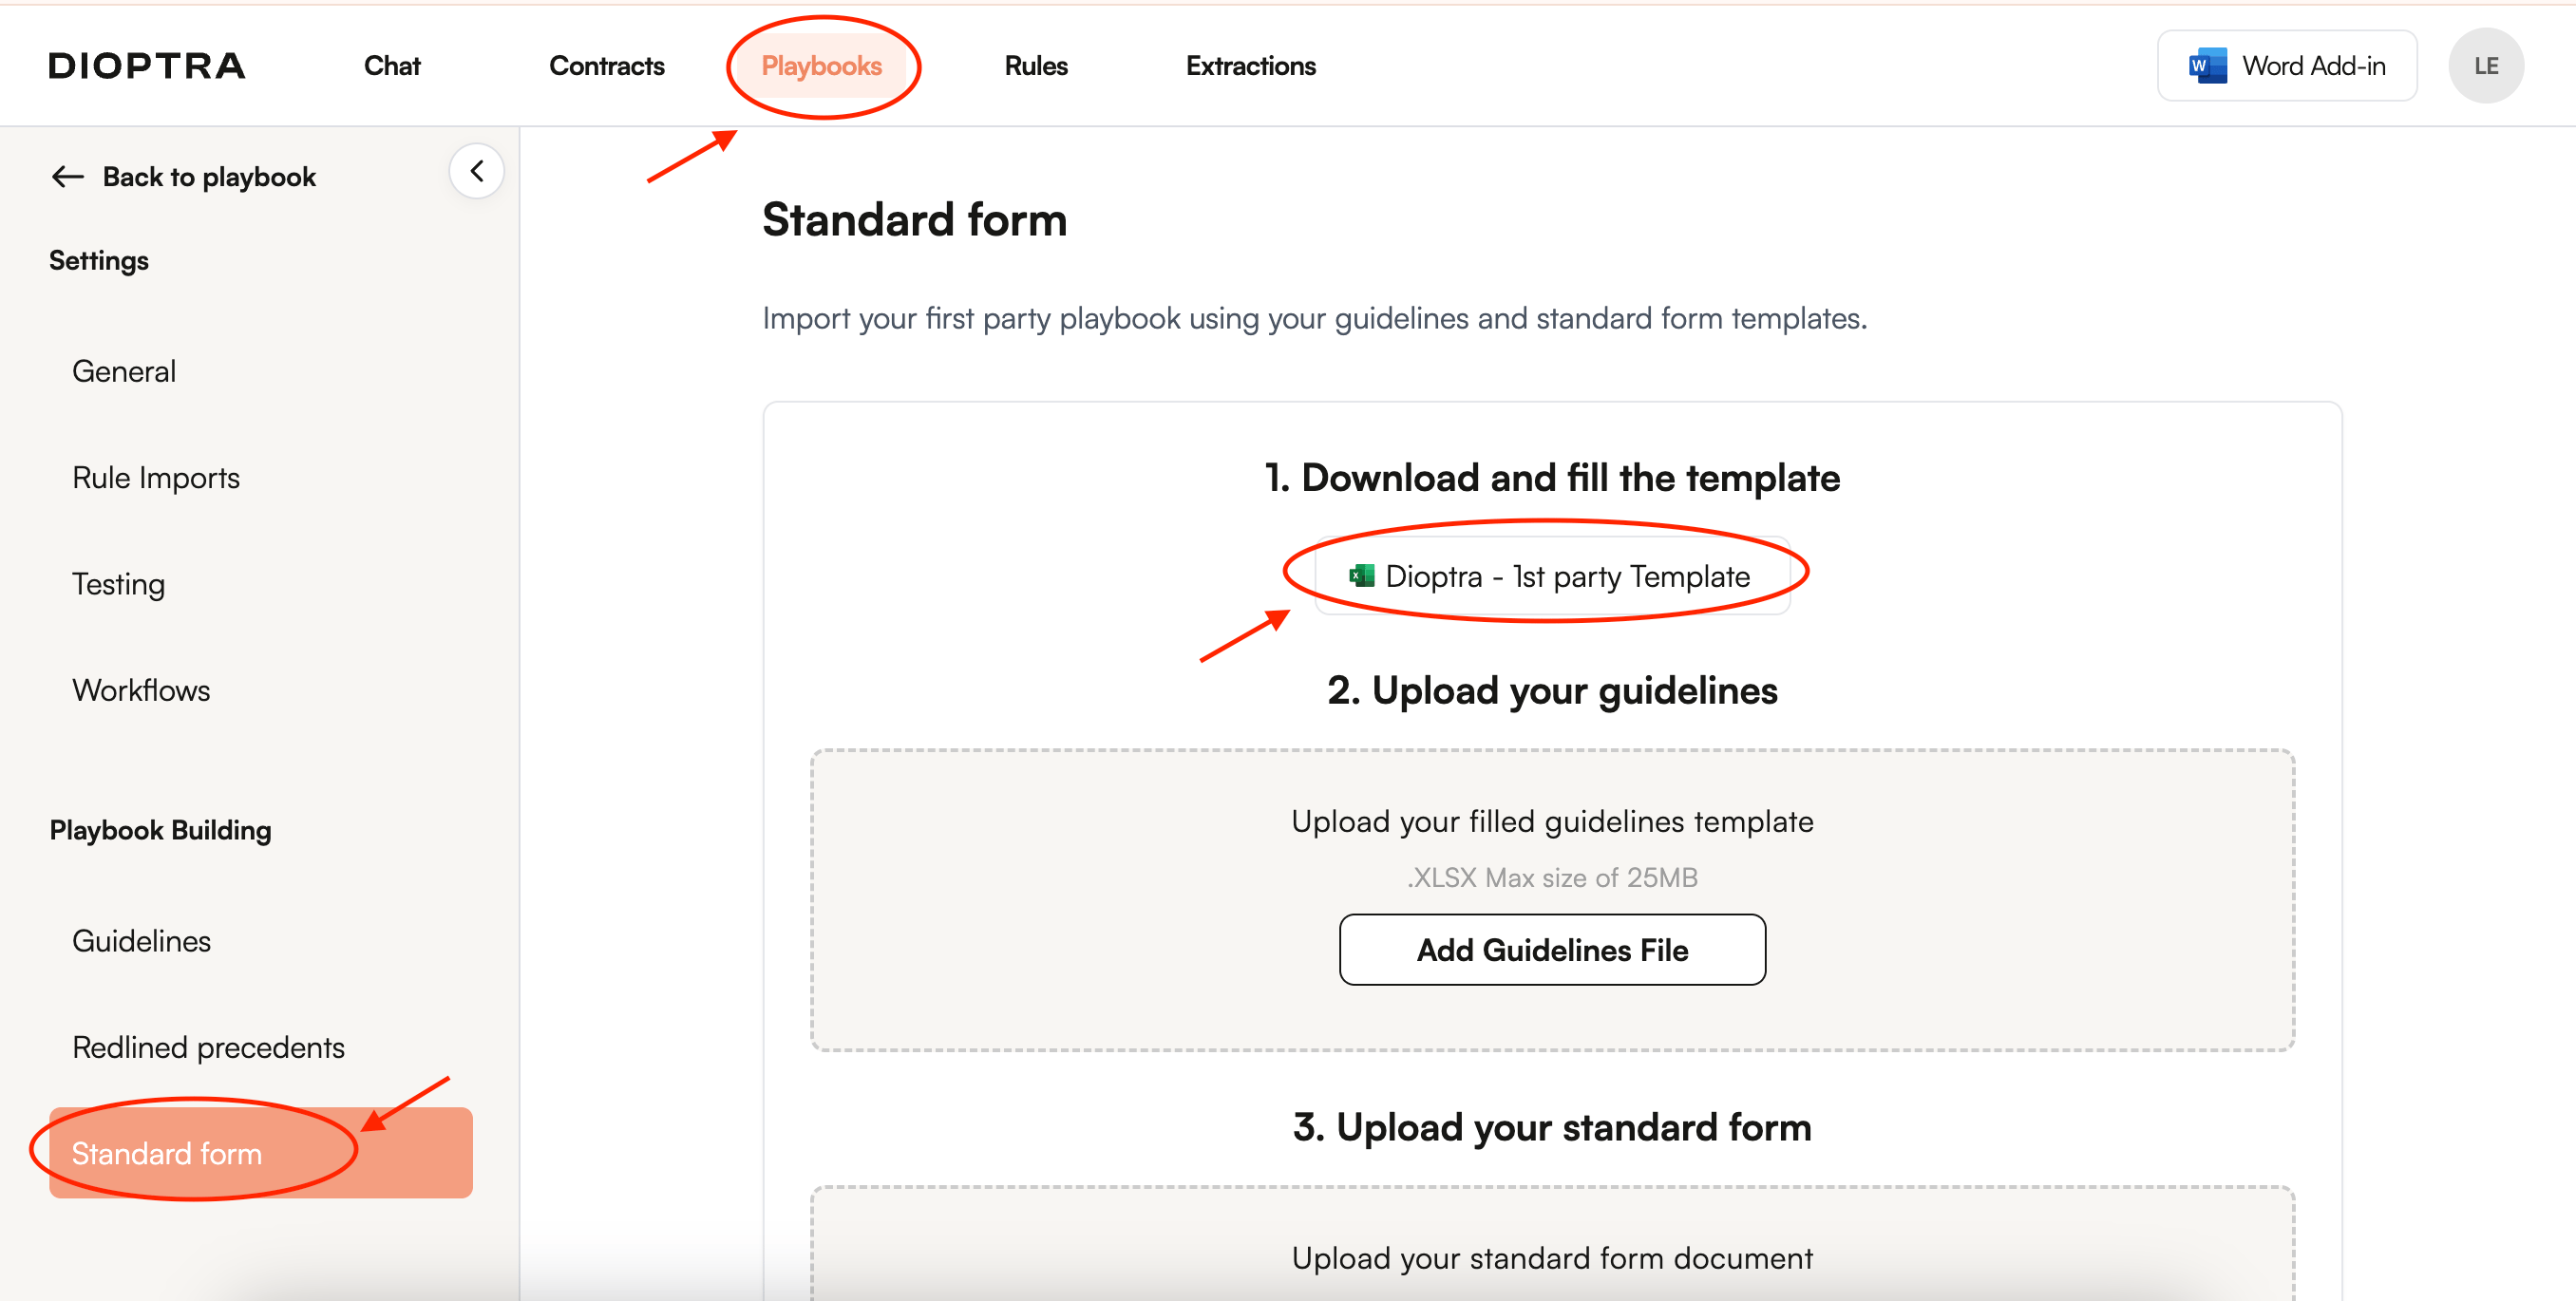
Access either the blank 1st party template available in the Web App or Dioptra's starter [NDA](https://docs.google.com/spreadsheets/d/1XYb_5w8GX5DEr-p5c4gCd5Y3BVlLhcvQ/edit?usp=sharing\&ouid=102224402458685325174\&rtpof=true\&sd=true) or [SaaS Vendor Favorable](https://docs.google.com/spreadsheets/d/1l2IzPxPgjk8pDY1Z8KkxpKzsg-Osnsq_/edit?usp=sharing\&ouid=102224402458685325174\&rtpof=true\&sd=true) 1st party templates to create your guidelines.
2. Attach your standard template and existing playbook to the chat using the "+" icon at the bottom of the chat (if one of these documents is where you have the Chat open in Word, you only need to attach the one that is not open). Note: if your existing playbook is in a format other than Word or PDF, you will need to first convert it to a .docx file, but you don't need to make it look pretty or fit on the page. Submit the request.
3. The final output will be a table in the correct format. Use the button under the Chat output with the table to copy and then paste into an Excel sheet.
What you need: The Dioptra Word Add-In, your example redlines, your template form, our managed prompt.
Steps:
1. Open the Dioptra Word Add-In, navigate to the saved prompts, and select "*Create 1st Party Paper Playbook from Redlines*"
2. Attach your standard template and example redlines to the Chat using the "+" icon at the bottom of the Chat (if one of these documents is where you have the Chat open in Word, you only need to attach the ones that are not open). Note: to properly inform the agent, the example redlines should show both the counterparty's redlines and your own and you should include example redlines for the negotiation stage that you want the agent to mimic. For example, if you want the agent to create redlines that reflect your first turn responses, only use example redlines that reflect your first turn responses.
3. The final output will be a table in the correct format. Use the button under the Chat output with the table to copy and then paste into an Excel sheet.
Note: If your objective is a playbook that accurately reflects your preferred positions, this is the least likely approach to achieve that objective as the agent will have insufficient insights into your preferences.
What you need: The Dioptra Word Add-In, your template form, our managed prompt.
Steps:
1. Open the Dioptra Word Add-In, navigate to the saved prompts, and select "*Create 1st Party Paper Playbook from Template*"
2. Attach your standard template to the Chat using the "+" icon at the bottom of the Chat (if you already have your standard template open where you have the Chat open in Word, it does not need to be attached).
3. The final output will be a table in the correct format. Use the button under the Chat output with the table to copy and then paste into an Excel sheet.
Access either the blank 1st party template available in the Web App or Dioptra's starter [NDA](https://docs.google.com/spreadsheets/d/1XYb_5w8GX5DEr-p5c4gCd5Y3BVlLhcvQ/edit?usp=sharing\&ouid=102224402458685325174\&rtpof=true\&sd=true) or [SaaS Vendor Favorable](https://docs.google.com/spreadsheets/d/1l2IzPxPgjk8pDY1Z8KkxpKzsg-Osnsq_/edit?usp=sharing\&ouid=102224402458685325174\&rtpof=true\&sd=true) 1st party templates to create your guidelines.
 Fill in a row for each issue that may be presented by a counterparty where you want the Dioptra Agent to take action when reviewing counterparty redlines. Each row has 8 columns (category, section, issue, fallback, comment, context, approval, risk score), but only 3 (section, issue, and fallback) are required to create automated redlines. Adding content to the others provides additional benefits for your redlining experience.
***Category*** - general category for the issue (e.g. liability, payments)
***Section*** - identifying the related section of your standard form
***Issue*** - the counterparty’s change
***Fallback*** - how you want to respond to the counterparty’s change
***Comment*** - a Word comment that you want included anytime the issue arises
***Context*** - a description of the issue for your internal team
***Approval*** - a description of who would need to approve non-automated deviations
***Risk Score*** - identifying the issue as high, medium or low risk
| **Category** | **Section** | **Issue** | **Fallback** | **Comment** | **Context** | **Approval** | **Risk Score** |
| :----------------------------------------------------------------------------- | :-------------------------------------------------------------------------------------------------------------------------------------------------------------------------------------------------------------------------------------------------- | :----------------------------------------------------------------------------------------------------------------------------------- | :---------------------------------------------------------------------------------------------------------------------------------------------------------------------------------------------------------------------------------------------------------------------------------------------------------------------------------------------------------------------------------------------------------------------------------------------------------------------------------------------------------------------------------------------------- | :---------------------------------------------------------------------------------- | :------------------------------------------------------------------------------------------------------------------------------------------------------ | :--------------------------------------------------------------------------------------------------------------- | :-------------------------------------------------------------------------------------------------------------------------------------- |
| *(Optional) Category for the issue or section (e.g. liability, payments, etc)* | \_The section number and title from your standard form. For example: 1.1 Permitted Use. \_ \_For sections with no title, provide a general description of what the section is doing. \_ *For issues where there is no section, leave it blank.* | \_The description of the issue introduced by the tracked changes. \_ \_For example: Removal of malware warranty from the remedy \_ | \_The instruction to the agent on how you want it to remedy the issue. \_ *Start your fallback with one of these 5 options:“Reject”, “Accept”, “Reject and modify to add”, “Accept and modify to add”, or “Change”Note that “accept” without modification will flag the issue and leave the counterparty redlines in place until you accept them in Word.For example: Accept and modify to meet the intent of the preferred license terms: During the subscription Term, We grant customer a “non-transferable”, “non-sublicenseable” license to …* | *(Optional) The text of a comment to be left to the Counterparty as a Word comment* | *(Optional) Information that you want included in the description of the rule internally for your company’s reviewer of the agreement or the playbook.* | *(Optional) Additional escalation procedures. This will be included in the description preceded by “Approvals:”* | \_(Optional) A risk score to apply to the rule: High, Medium or Low \_ *(If you leave this blank the risk score will default to High)* |
What you need: The Dioptra Word Add-In, your existing playbook (guidelines, cheat sheet, etc), your example redlines, your template form, our managed prompt.
Steps:
1. Open the Dioptra Word Add-In, navigate to the saved prompts, and select "*Create 1st Party Playbook From Redlines, Existing Playbook, and Template*".
Fill in a row for each issue that may be presented by a counterparty where you want the Dioptra Agent to take action when reviewing counterparty redlines. Each row has 8 columns (category, section, issue, fallback, comment, context, approval, risk score), but only 3 (section, issue, and fallback) are required to create automated redlines. Adding content to the others provides additional benefits for your redlining experience.
***Category*** - general category for the issue (e.g. liability, payments)
***Section*** - identifying the related section of your standard form
***Issue*** - the counterparty’s change
***Fallback*** - how you want to respond to the counterparty’s change
***Comment*** - a Word comment that you want included anytime the issue arises
***Context*** - a description of the issue for your internal team
***Approval*** - a description of who would need to approve non-automated deviations
***Risk Score*** - identifying the issue as high, medium or low risk
| **Category** | **Section** | **Issue** | **Fallback** | **Comment** | **Context** | **Approval** | **Risk Score** |
| :----------------------------------------------------------------------------- | :-------------------------------------------------------------------------------------------------------------------------------------------------------------------------------------------------------------------------------------------------- | :----------------------------------------------------------------------------------------------------------------------------------- | :---------------------------------------------------------------------------------------------------------------------------------------------------------------------------------------------------------------------------------------------------------------------------------------------------------------------------------------------------------------------------------------------------------------------------------------------------------------------------------------------------------------------------------------------------- | :---------------------------------------------------------------------------------- | :------------------------------------------------------------------------------------------------------------------------------------------------------ | :--------------------------------------------------------------------------------------------------------------- | :-------------------------------------------------------------------------------------------------------------------------------------- |
| *(Optional) Category for the issue or section (e.g. liability, payments, etc)* | \_The section number and title from your standard form. For example: 1.1 Permitted Use. \_ \_For sections with no title, provide a general description of what the section is doing. \_ *For issues where there is no section, leave it blank.* | \_The description of the issue introduced by the tracked changes. \_ \_For example: Removal of malware warranty from the remedy \_ | \_The instruction to the agent on how you want it to remedy the issue. \_ *Start your fallback with one of these 5 options:“Reject”, “Accept”, “Reject and modify to add”, “Accept and modify to add”, or “Change”Note that “accept” without modification will flag the issue and leave the counterparty redlines in place until you accept them in Word.For example: Accept and modify to meet the intent of the preferred license terms: During the subscription Term, We grant customer a “non-transferable”, “non-sublicenseable” license to …* | *(Optional) The text of a comment to be left to the Counterparty as a Word comment* | *(Optional) Information that you want included in the description of the rule internally for your company’s reviewer of the agreement or the playbook.* | *(Optional) Additional escalation procedures. This will be included in the description preceded by “Approvals:”* | \_(Optional) A risk score to apply to the rule: High, Medium or Low \_ *(If you leave this blank the risk score will default to High)* |
What you need: The Dioptra Word Add-In, your existing playbook (guidelines, cheat sheet, etc), your example redlines, your template form, our managed prompt.
Steps:
1. Open the Dioptra Word Add-In, navigate to the saved prompts, and select "*Create 1st Party Playbook From Redlines, Existing Playbook, and Template*".
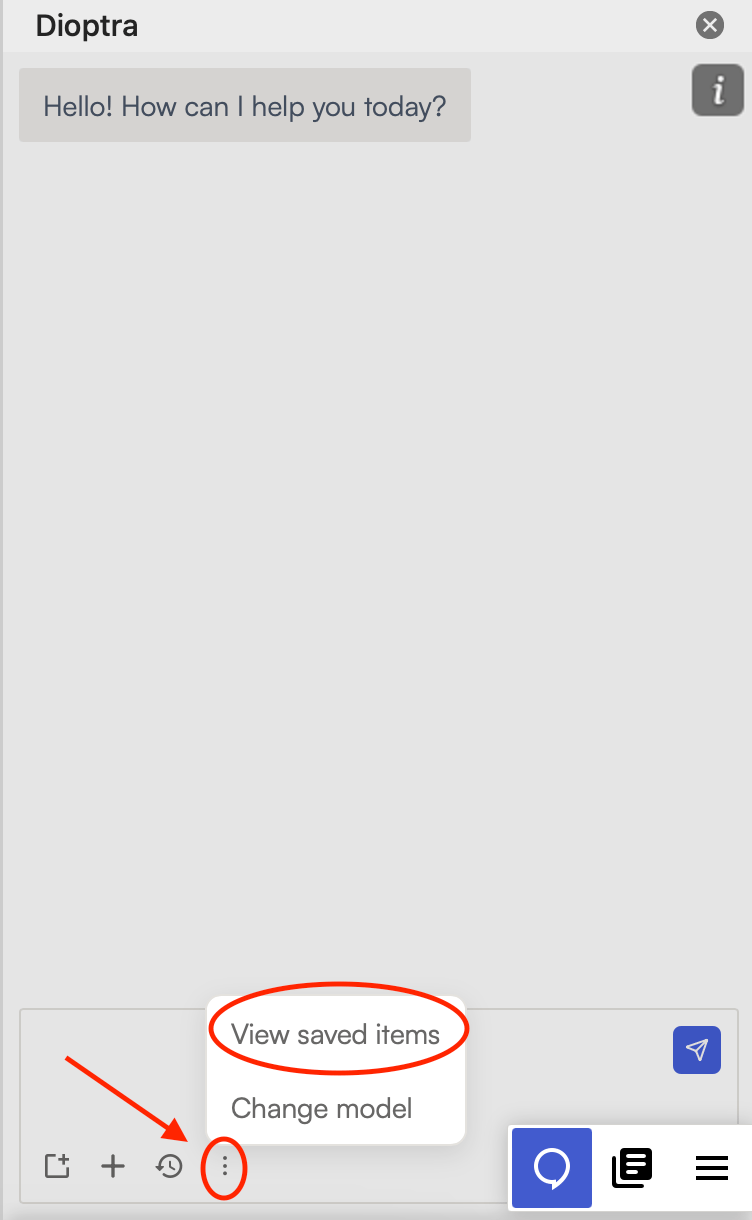 2. Attach your standard template, existing playbook, and example redlines to the Chat using the "+" icon at the bottom of the Chat (if one of these documents is where you have the Chat open in Word, you only need to attach the ones that are not open). Note: to properly inform the agent, the example redlines should show both the counterparty's redlines and your own and you should include example redlines for the negotiation stage that you want the agent to mimic. For example, if you want the agent to create redlines that reflect your first turn responses, only use example redlines that reflect your first turn responses.
3. The final output will be a table in the correct format. Use the button under the Chat output with the table to copy and then paste into an Excel sheet.
**Playbook Table Tips:**
* The agent can only execute based on the language in the counterparty redlines. In other words, if your instruction requires contextual information like the fees under the agreement and that information is not part of the template, the agent won't be able to respond properly to that instruction.
* The more precise the text in the “issue” and “fallback” columns, the more tailored the results will be. For the issue detection, the agent defaults to the broadest possible reading to make sure nothing is missed.
* If you want the agent to use particular new language, put the preferred language in quotes. If you want it to reflect the positions in preferred language, but do not need particular language and want to minimize redlines use “meet the intent of: \[preferred language]”.
### **Step 2: Initiate the Playbook Set-Up Using the Web App.**
1. Navigate to the playbook tab in the app and select + Playbook
2. Attach your standard template, existing playbook, and example redlines to the Chat using the "+" icon at the bottom of the Chat (if one of these documents is where you have the Chat open in Word, you only need to attach the ones that are not open). Note: to properly inform the agent, the example redlines should show both the counterparty's redlines and your own and you should include example redlines for the negotiation stage that you want the agent to mimic. For example, if you want the agent to create redlines that reflect your first turn responses, only use example redlines that reflect your first turn responses.
3. The final output will be a table in the correct format. Use the button under the Chat output with the table to copy and then paste into an Excel sheet.
**Playbook Table Tips:**
* The agent can only execute based on the language in the counterparty redlines. In other words, if your instruction requires contextual information like the fees under the agreement and that information is not part of the template, the agent won't be able to respond properly to that instruction.
* The more precise the text in the “issue” and “fallback” columns, the more tailored the results will be. For the issue detection, the agent defaults to the broadest possible reading to make sure nothing is missed.
* If you want the agent to use particular new language, put the preferred language in quotes. If you want it to reflect the positions in preferred language, but do not need particular language and want to minimize redlines use “meet the intent of: \[preferred language]”.
### **Step 2: Initiate the Playbook Set-Up Using the Web App.**
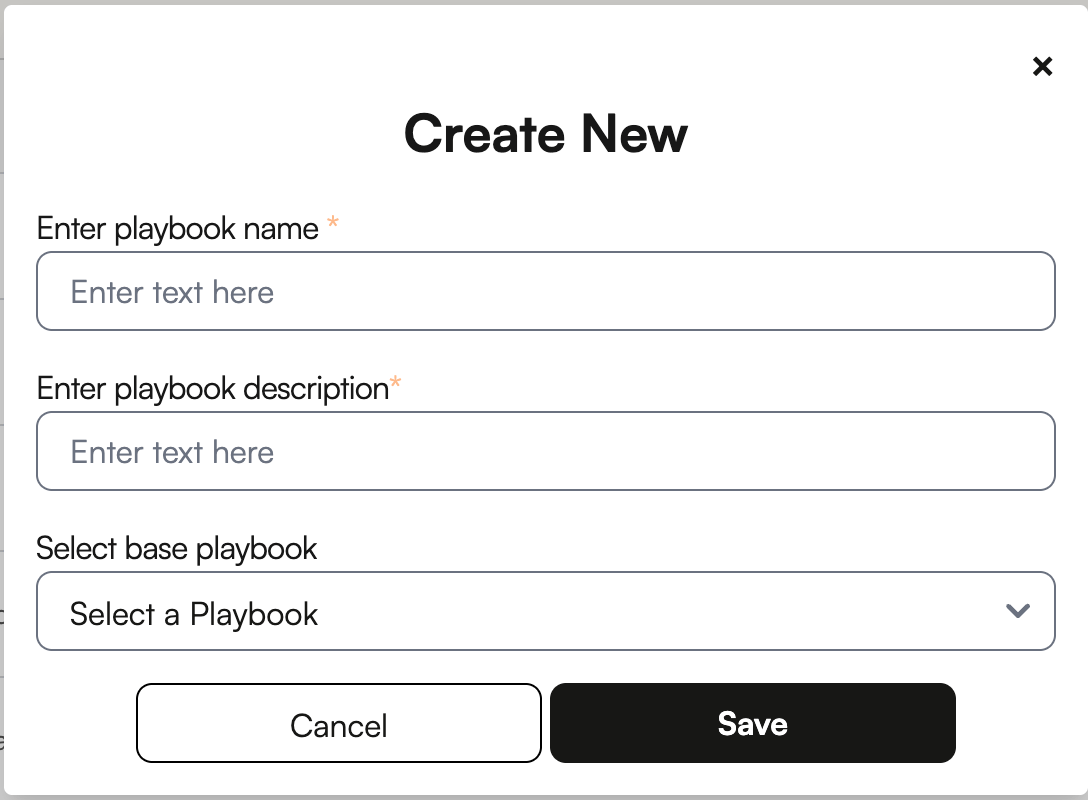
1. Navigate to the playbook tab in the app and select + Playbook
 2. Give your playbook a name and description and press Save (Note: do NOT select a base playbook, leave this field blank).
 ### **Step 3: Configure Your Playbook In the Web App**
1. Select Playbook Setup
### **Step 3: Configure Your Playbook In the Web App**
1. Select Playbook Setup
 2. Navigate to Standard Form in the left-hand menu
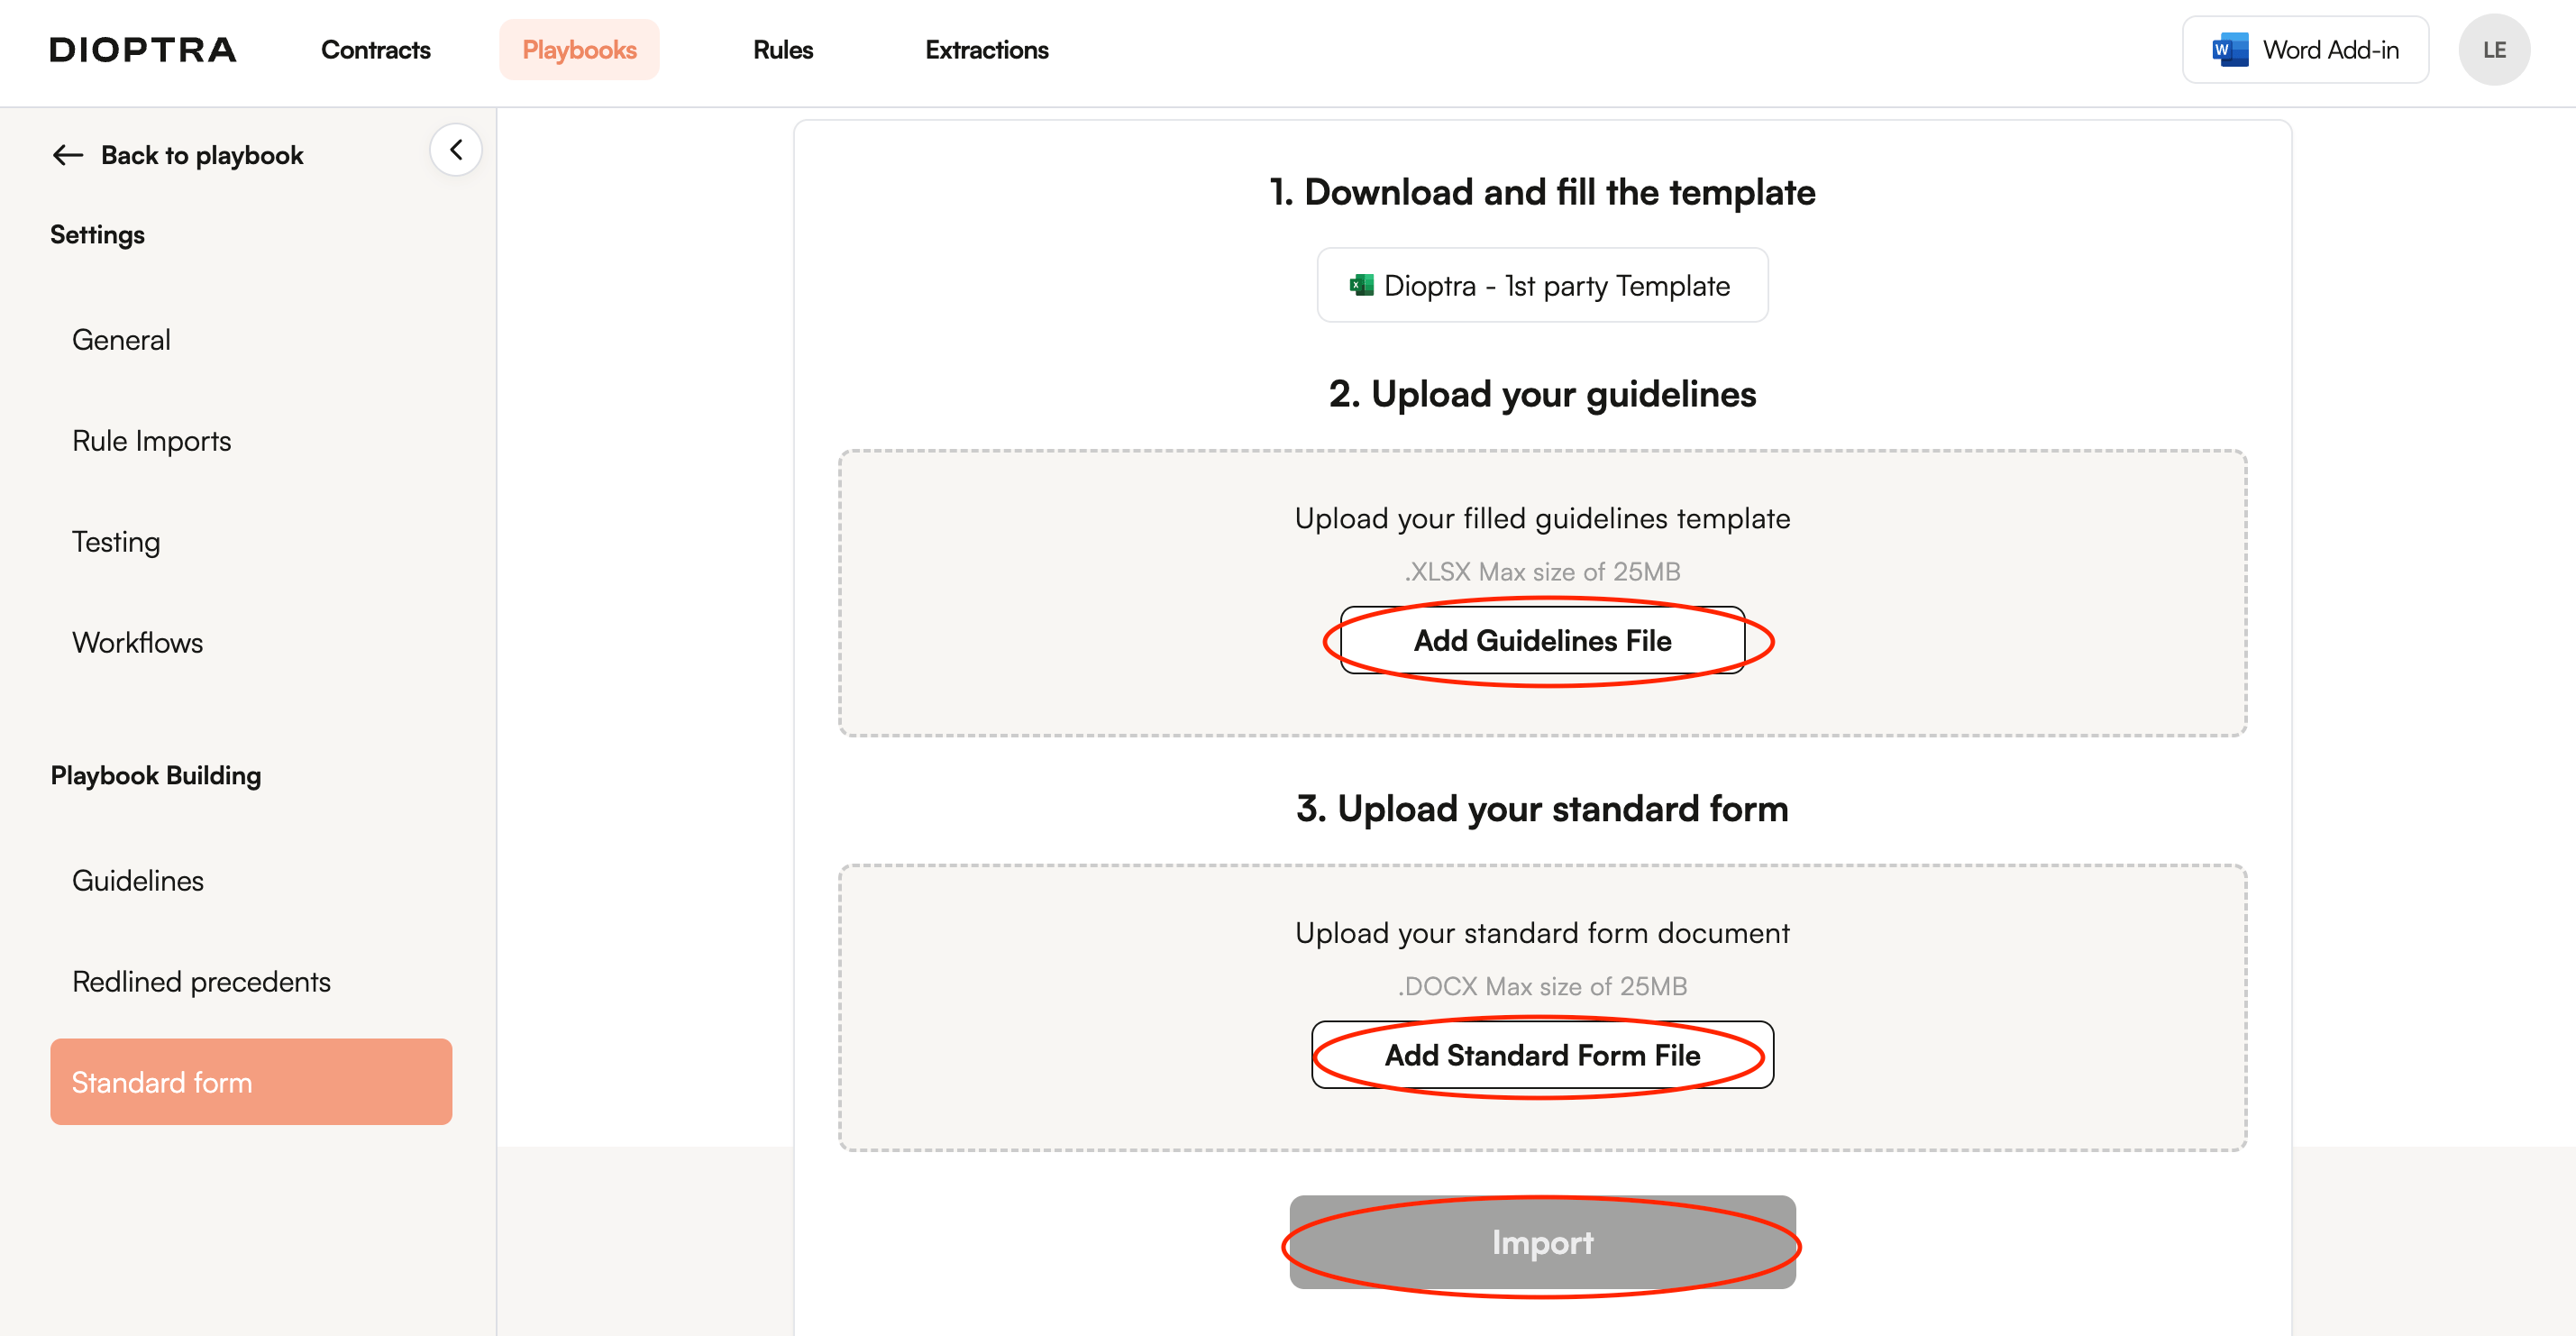
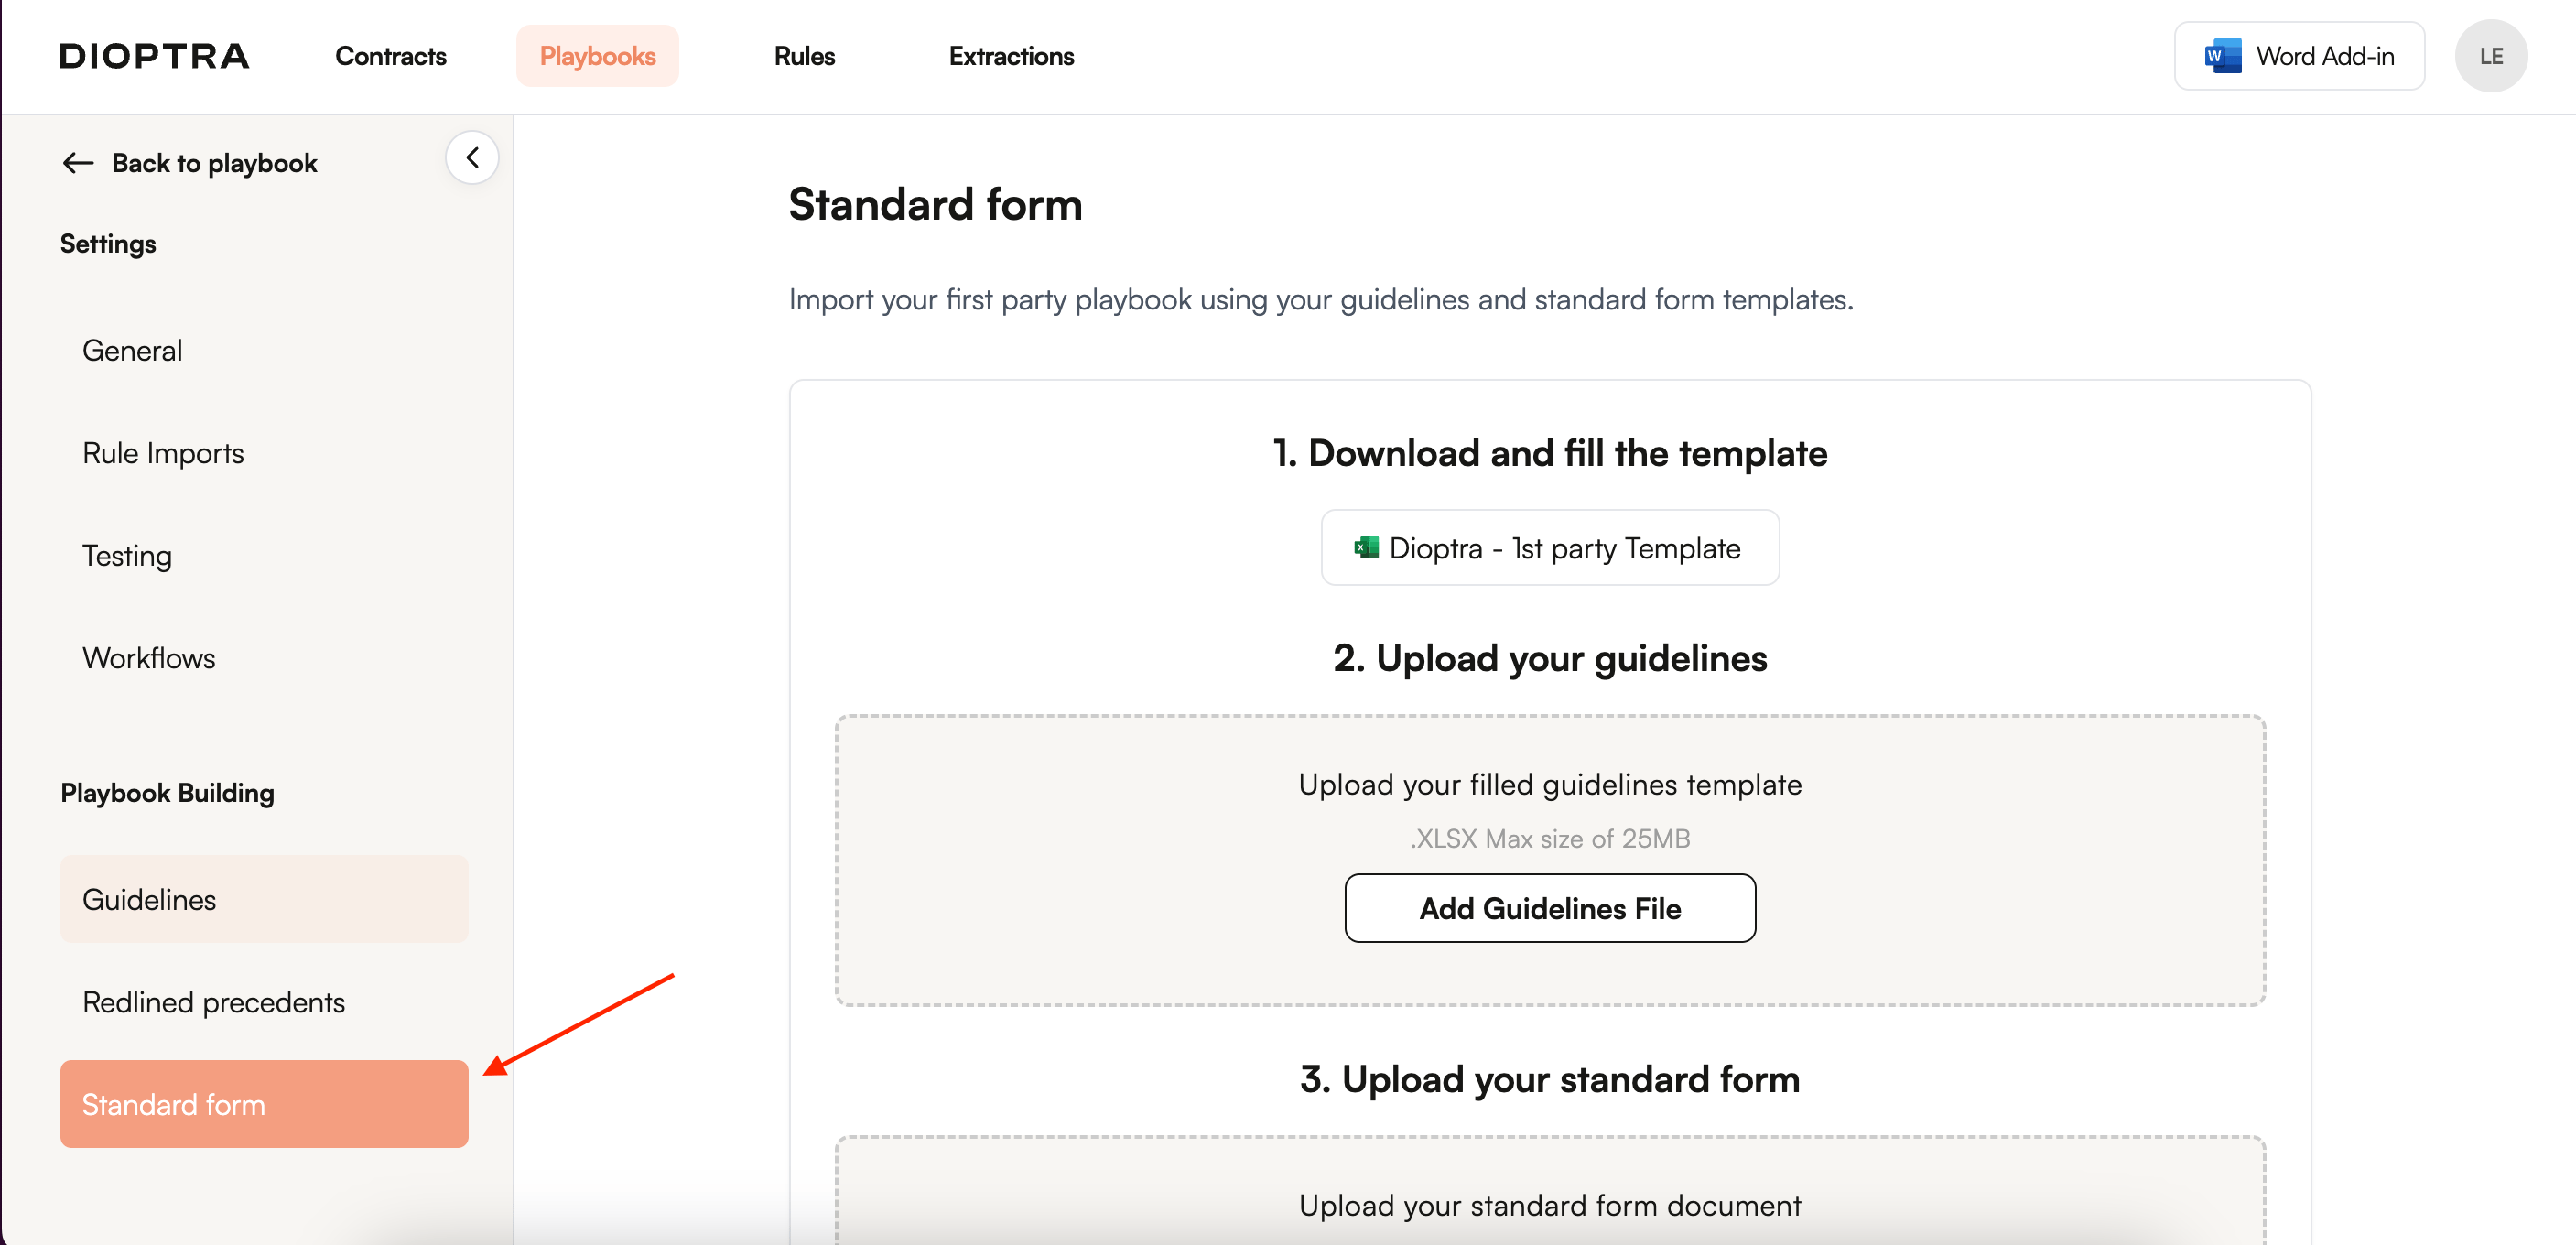 3. Upload your completed Playbook Table and your standard form and import to the playbook
 ### **Troubleshooting**
If your input fails, doublecheck your Playbook Table to make sure it is properly set up. To enable the import, for the "Add Guidelines File" you must upload an Excel document where the first row of the first sheet looks like this:
| **Category** | **Section** | **Issue** | **Fallback** | **Comment** | **Context** | **Approval** | **Risk Score** |
| :----------- | :---------- | :-------- | :----------- | :---------- | :---------- | :----------- | :------------- |
## Optimizing Your Playbook Rules
Our Chat agent and managed playbooks and market rules should provide you with a strong starting point for your custom playbook. We are constantly refining these resources to reduce the need for you to manually build the playbook rule prompts. However, from time to time you may decide to further improve your rules or build new rules manually. Here are our best practices.
### Adding Fallbacks
Fallbacks are available for rules set up in Advanced Mode.
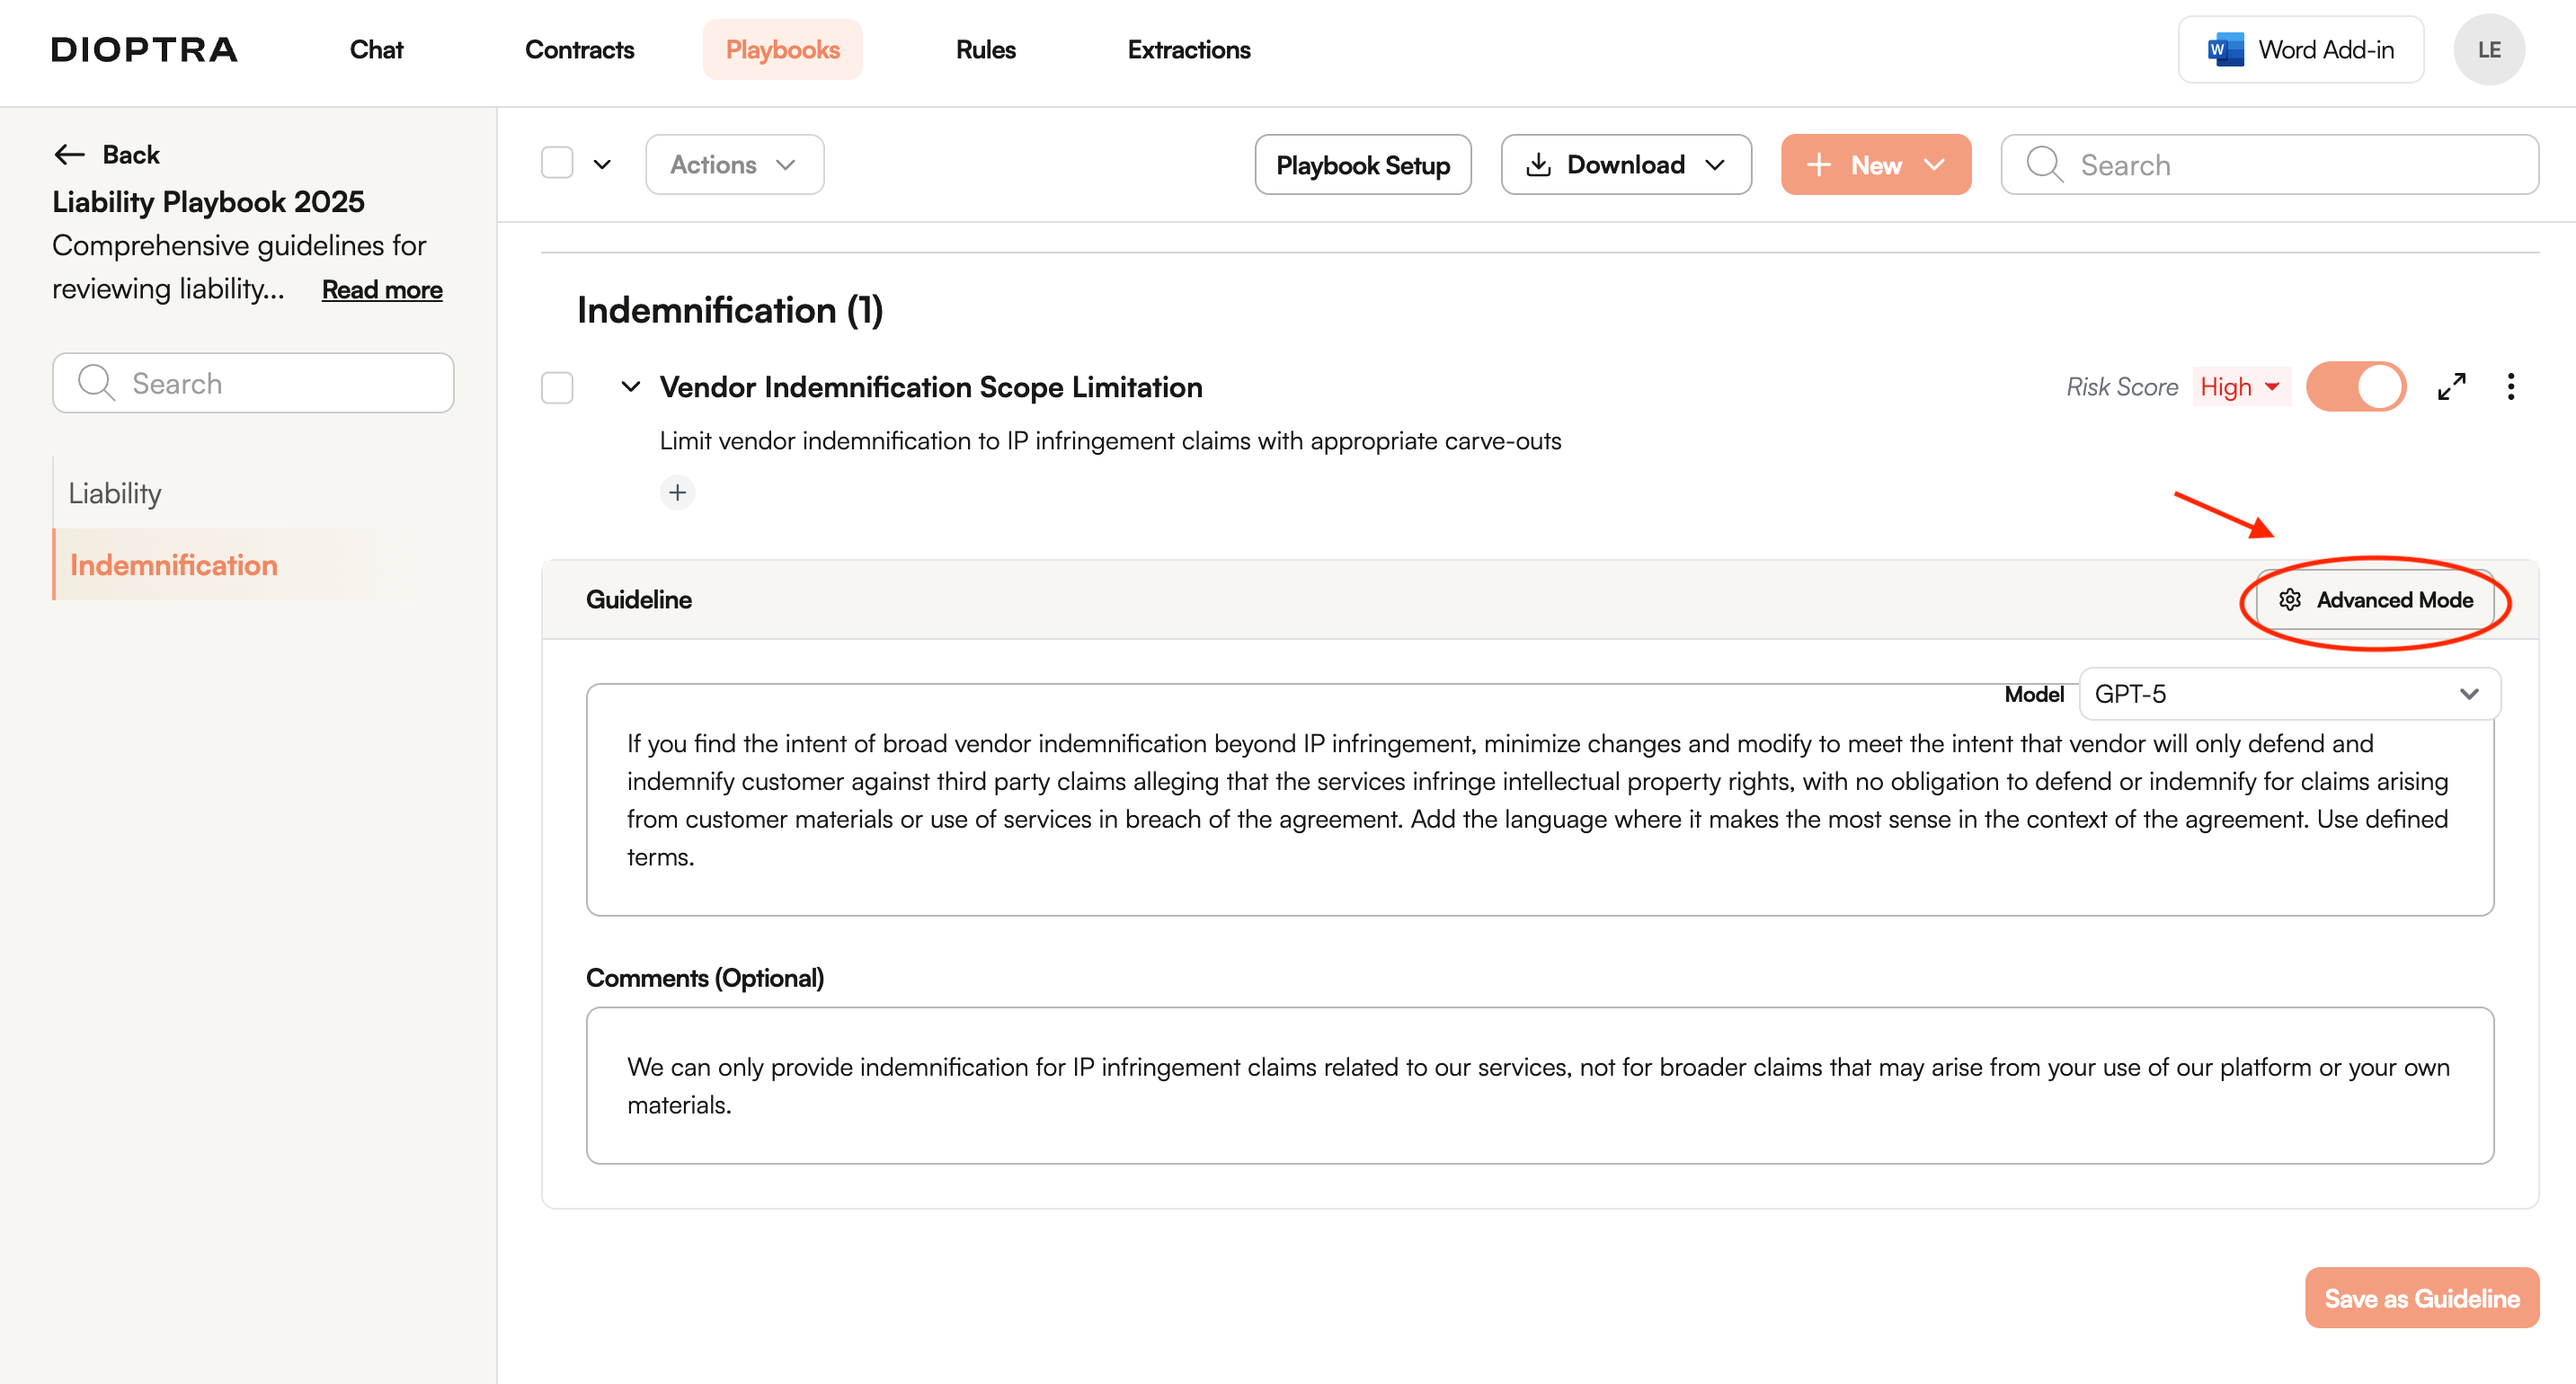
Below is a screen shot of a Simple Mode rule. To change to Advanced Mode, click where it says *Advanced Mode*. (Note that guidelines created in the Chat default to simple mode.)
### **Troubleshooting**
If your input fails, doublecheck your Playbook Table to make sure it is properly set up. To enable the import, for the "Add Guidelines File" you must upload an Excel document where the first row of the first sheet looks like this:
| **Category** | **Section** | **Issue** | **Fallback** | **Comment** | **Context** | **Approval** | **Risk Score** |
| :----------- | :---------- | :-------- | :----------- | :---------- | :---------- | :----------- | :------------- |
## Optimizing Your Playbook Rules
Our Chat agent and managed playbooks and market rules should provide you with a strong starting point for your custom playbook. We are constantly refining these resources to reduce the need for you to manually build the playbook rule prompts. However, from time to time you may decide to further improve your rules or build new rules manually. Here are our best practices.
### Adding Fallbacks
Fallbacks are available for rules set up in Advanced Mode.
Below is a screen shot of a Simple Mode rule. To change to Advanced Mode, click where it says *Advanced Mode*. (Note that guidelines created in the Chat default to simple mode.)
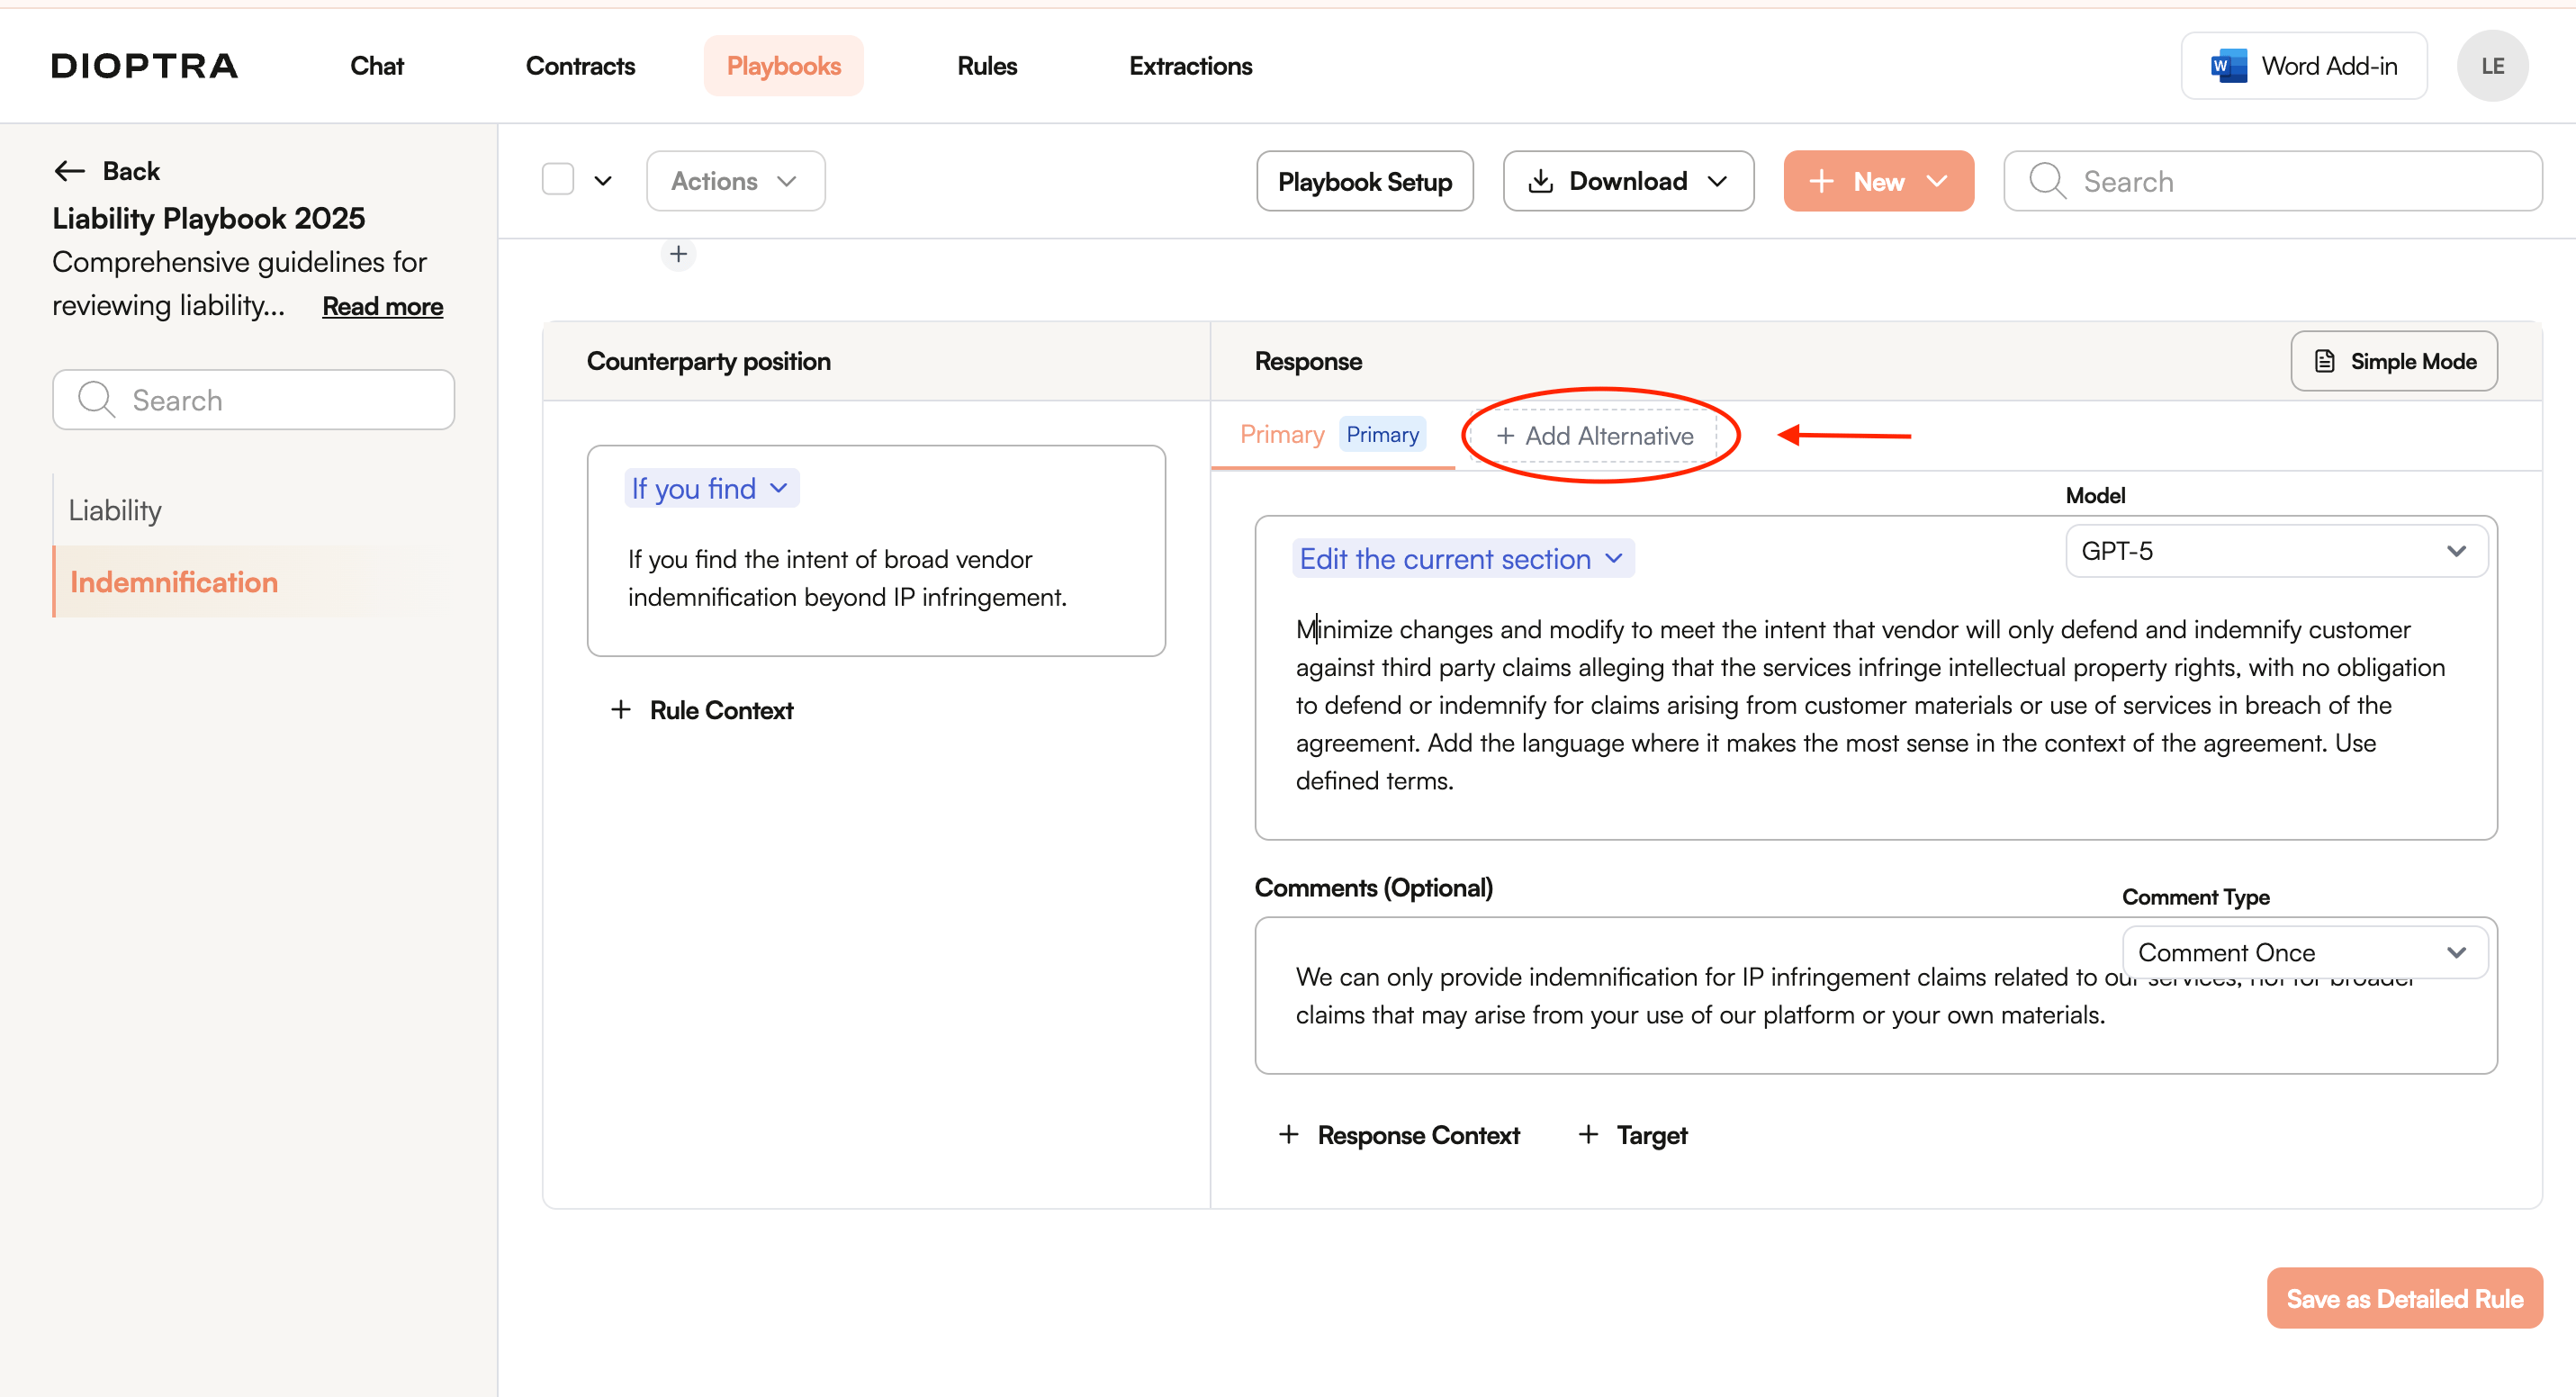
 When you are in advanced mode, the rule looks like the below. Click *+ Add Alternative* to add a fallback position. Add as many as you want.
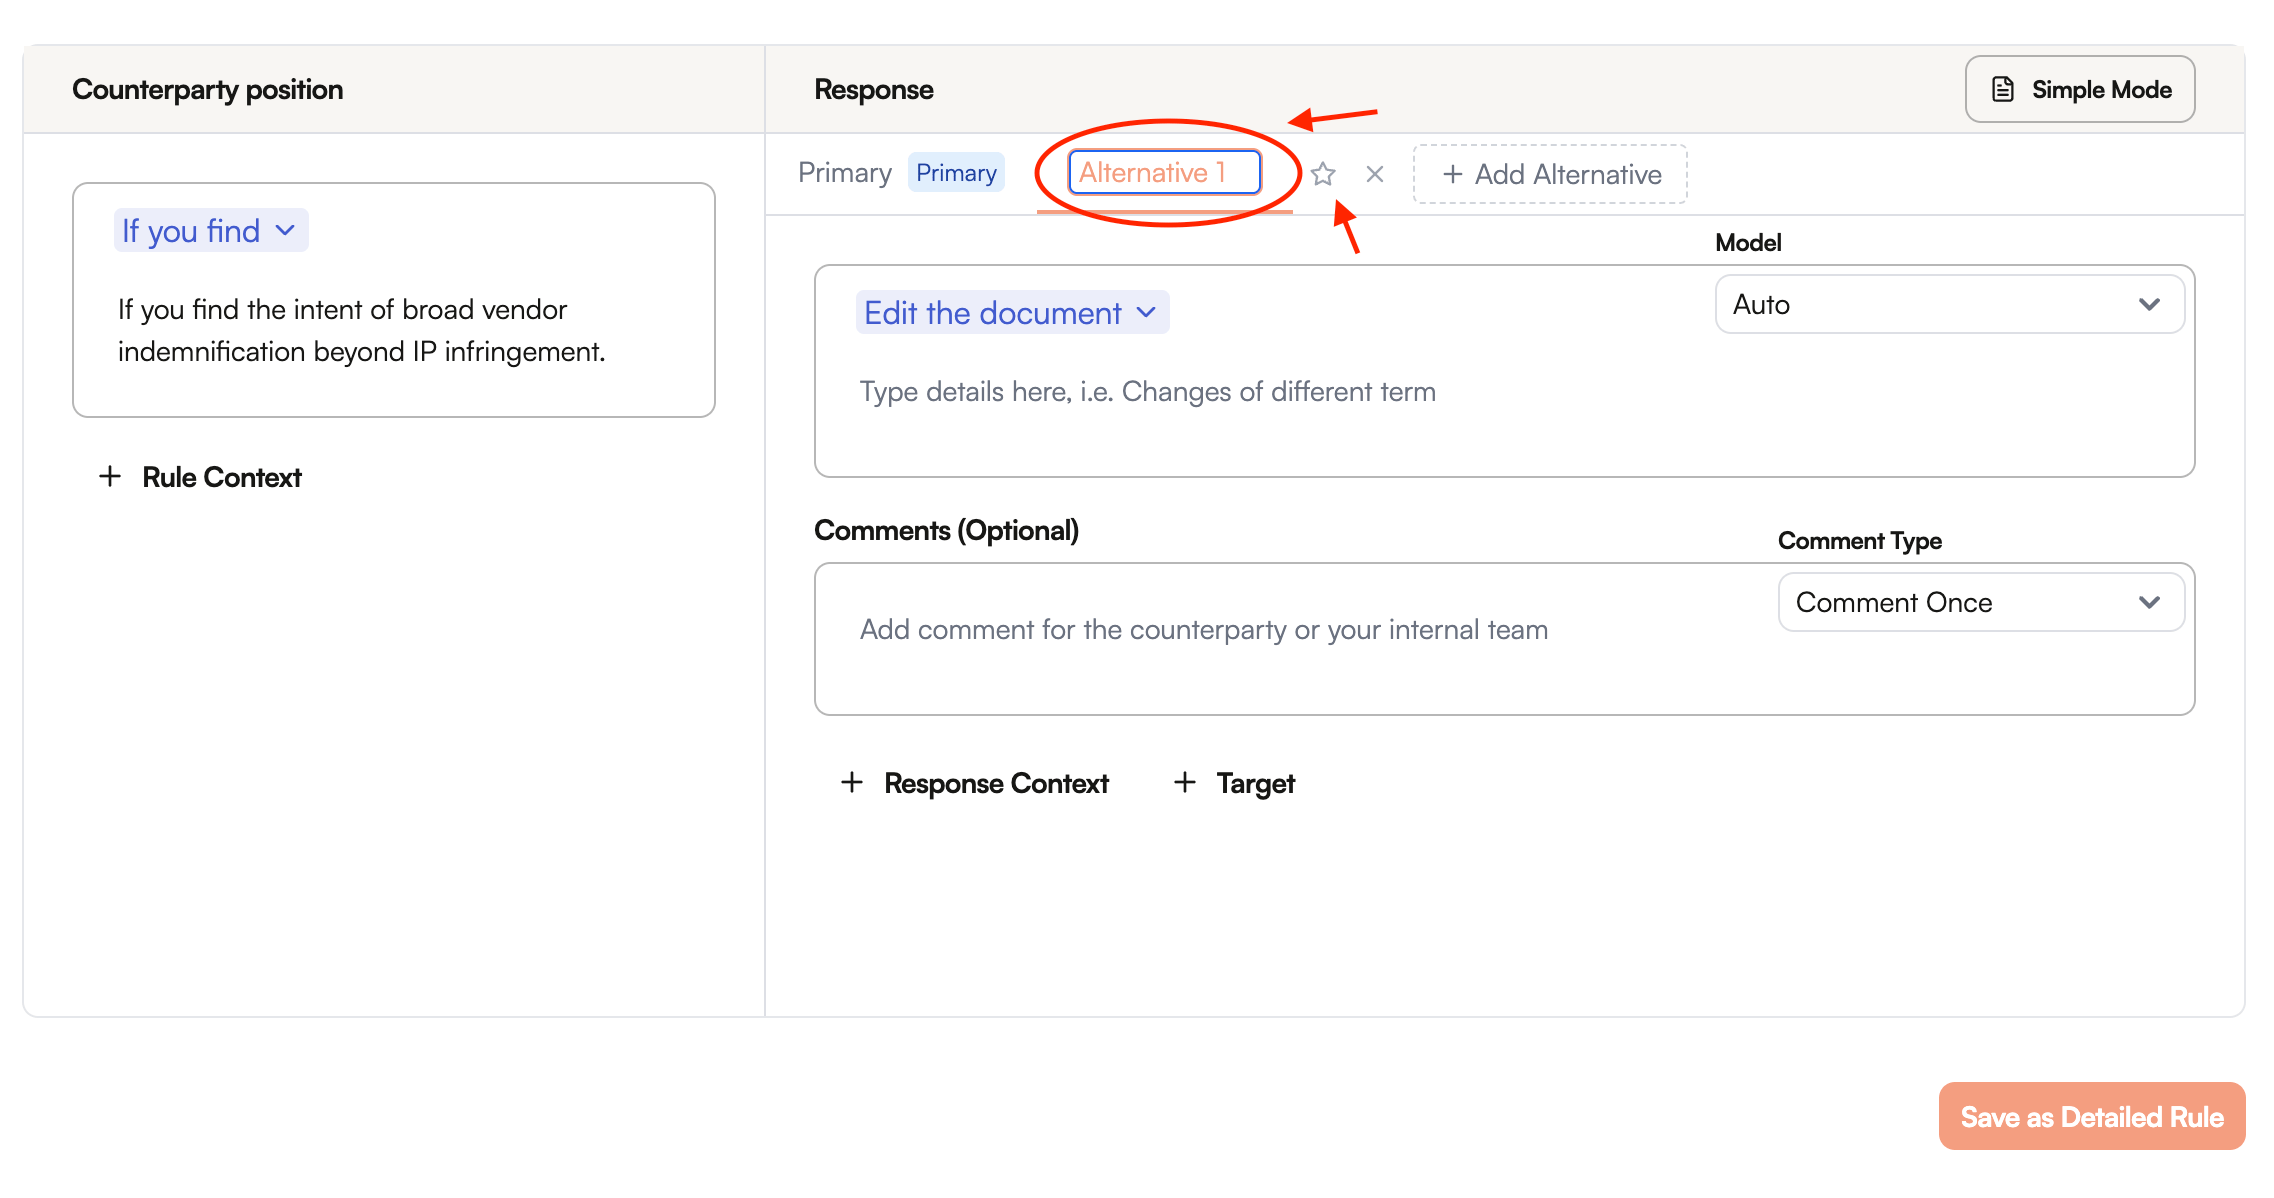
 Name the fallback, by clicking into the box where it says Alternative. Change an alternate fallback into your primary position by clicking the star.
 ### Prompting Patterns
Our playbook rules are structured as if/then statements.
#### "If" - the Trigger
*Step one to good AI redlining is making sure the rule is triggered for the right issues.*
The "if" statement is the instruction to the agent to find something in the contract. You can choose to have the trigger be an "if found" or an "if not found" condition.
"If found" example: If you find uncapped liability for negligence and negligence is not qualified as "gross" negligence.
"If not found" example: If you find the agreement does not include a warranty disclaimer.
LLMs do better with positive statements than negative statements. Where it is possible, try to structure the rule as an "if found" rule. For example if you want to make sure that indemnity procedures are present, instead of making it a rule for if you don't find indemnity procedures, make it a rule for if you find an indemnification obligation and the section does not include indemnification procedures.
Do you want the issue addressed only once or each time? If it is only once, be really specific about where you want it addressed. For example if you want to allow email for written notices, but only want to specify that in the notice provision, your rule should be "if you find a notice section that does not include the intent that email constitutes written notice", whereas if you want email being sufficient to be added in each instance where written notice is specified, your rules should be "if you find a requirement for written notice that does not specify the intent that email is sufficient."
#### "Then" - the Response
This is the redlining instruction for the agent. We recommend that you start with some of our managed rules as examples for phrasing. If your goal is surgical redlines, include the phrase "Leverage existing language to minimize changes" in your instruction.
### Questions to consider and prompting tips
* Do you require specific language or just the intent?
* For specific language include your specific language in quotes. This can be an entire clause or just specific language within the clause.
* For the general intent the trigger should use the term "intent" (e.g. "if you find/don't find language that **\_meets the intent of \_**XYZ" or "leverage existing language to minimize changes and ***meet the intent that*** XYZ")
* Are there many conditions that need to be satisfied?
* For the "if" statement, use "each and every" to describe the list of conditions if you are looking to add all conditions and use "any" to describe the list of conditions if you are looking to remove all conditions.
* For the "then" statement, use "each and every" for both adding and removing.
Check out these videos for rule troubleshooting:
* [My rule is applying when it shouldn’t be or vice versa (should be applying but is not); how can I fix that?](https://www.loom.com/share/0bfaf8f10f1241dbad400f8481cae72d)
* [The rule applied but I don’t like the redlines my playbook is generating, how can I fix that?](https://www.loom.com/share/76563bbdfd7b4401803e6e409b7efbed)
### Choosing the Right Model
You can choose different models based on the nature of your rule. Where your rule is a strict application such as the above example of adding "gross" before negligence or adding "reasonable" before cooperation, you are better off with a "dumber" model such as 4.0. Where you want the AI to be more creative, you should use a more sophisticated reasoning model.
### Testing your Rules
You can test your rules in our Web App to see if they are working as you expect. Check out these video walkthroughs:
* [Adding documents to test rules](https://www.loom.com/share/9fcf51634e734409b86964f397b13ece)
* [How can I test and iterate on a rule](https://www.loom.com/share/5410b0a9f87947c4909bb64bbf701ef1)?
### Prompting Patterns
Our playbook rules are structured as if/then statements.
#### "If" - the Trigger
*Step one to good AI redlining is making sure the rule is triggered for the right issues.*
The "if" statement is the instruction to the agent to find something in the contract. You can choose to have the trigger be an "if found" or an "if not found" condition.
"If found" example: If you find uncapped liability for negligence and negligence is not qualified as "gross" negligence.
"If not found" example: If you find the agreement does not include a warranty disclaimer.
LLMs do better with positive statements than negative statements. Where it is possible, try to structure the rule as an "if found" rule. For example if you want to make sure that indemnity procedures are present, instead of making it a rule for if you don't find indemnity procedures, make it a rule for if you find an indemnification obligation and the section does not include indemnification procedures.
Do you want the issue addressed only once or each time? If it is only once, be really specific about where you want it addressed. For example if you want to allow email for written notices, but only want to specify that in the notice provision, your rule should be "if you find a notice section that does not include the intent that email constitutes written notice", whereas if you want email being sufficient to be added in each instance where written notice is specified, your rules should be "if you find a requirement for written notice that does not specify the intent that email is sufficient."
#### "Then" - the Response
This is the redlining instruction for the agent. We recommend that you start with some of our managed rules as examples for phrasing. If your goal is surgical redlines, include the phrase "Leverage existing language to minimize changes" in your instruction.
### Questions to consider and prompting tips
* Do you require specific language or just the intent?
* For specific language include your specific language in quotes. This can be an entire clause or just specific language within the clause.
* For the general intent the trigger should use the term "intent" (e.g. "if you find/don't find language that **\_meets the intent of \_**XYZ" or "leverage existing language to minimize changes and ***meet the intent that*** XYZ")
* Are there many conditions that need to be satisfied?
* For the "if" statement, use "each and every" to describe the list of conditions if you are looking to add all conditions and use "any" to describe the list of conditions if you are looking to remove all conditions.
* For the "then" statement, use "each and every" for both adding and removing.
Check out these videos for rule troubleshooting:
* [My rule is applying when it shouldn’t be or vice versa (should be applying but is not); how can I fix that?](https://www.loom.com/share/0bfaf8f10f1241dbad400f8481cae72d)
* [The rule applied but I don’t like the redlines my playbook is generating, how can I fix that?](https://www.loom.com/share/76563bbdfd7b4401803e6e409b7efbed)
### Choosing the Right Model
You can choose different models based on the nature of your rule. Where your rule is a strict application such as the above example of adding "gross" before negligence or adding "reasonable" before cooperation, you are better off with a "dumber" model such as 4.0. Where you want the AI to be more creative, you should use a more sophisticated reasoning model.
### Testing your Rules
You can test your rules in our Web App to see if they are working as you expect. Check out these video walkthroughs:
* [Adding documents to test rules](https://www.loom.com/share/9fcf51634e734409b86964f397b13ece)
* [How can I test and iterate on a rule](https://www.loom.com/share/5410b0a9f87947c4909bb64bbf701ef1)?